Pages

Showing posts with label #ewew cooks: Noodles/Pasta. Show all posts

Thursday, 19 October 2023

#ewew cooks Ipoh Kai Si Hor Fun (or Shredded Chicken Noodles)

For those who have followed my blog long enough, you'd know I have a "thing" for Ipoh kai si hor fun (also known as Ipoh sar hor funkshf in short).  My love for it knows no bounds! ;)  I simply love to eat this noodle....but only in soup form (none of that dry-style nonsense which my family begs to differ, of course....lol).

For me, it's the lovely aroma of the clear prawn stock that sets it apart from all the other soup noodles.  And that was what led me to wonder if I could make this successfully at home, so I gave it a shot just for the fun of it.

With any bowl of 
kshf, you start with the broth which is quintessential to the success of your kshf.....and you begin by sauteeing prawn heads (about 20 of them, leftover heads from 1 kg of prawns I bought and peeled) in some oil.  The more oil you use, the more prawn oil you'll have at the end.  As soon as the prawns cook and turn bright orange, you'll see a stream of prawn oil being extracted from the prawn heads.  That's umami right there!

Next, add the desired amount water to the sauteed prawn heads (I used an amount that's good enough for two bowls of 
kshf) together with some chicken bones (I used choi yin kai bones for a richer flavour).  Simmer on low heat (for at least 30 - 45 mins or until you're pleased with the flavour) to extract all the flavours from the chicken bones and prawn heads and season accordingly.  You can choose to add sugar (or rock sugar) for some sweetness but I chose not to.  See that lovely layer of orange hue goodness in the stock? ;)

At the end of it all, you'll get this bowl of deliciously rich, umami prawn-flavoured stock which was good enough for two bowls of kshf.  I was quite surprised that it was so easy to do and it looked really
legit! ^.^

And that's pretty much all you have to do!  All you really need to make is the stock.  After that, all you need to do is to assemble your bowl of 
kshf.  Place your hor fun or kway teow in a bowl together with some Chinese chives and beansprouts (all lightly blanched).  I actually got these ingredients from the ex-Chang Kitchen boss coz since I was only making a bowl for myself, I didn't want to buy a whole packet of noodles or a bunch of chives and beansprouts just to make one portion.

Top it with some cooked prawns and shredded chicken (you can poach these two, for a little while, till cooked, in the same broth that you're simmering.  And just because it's a homemade version, you can put in big prawns...and more of it (which you won't get if you have it outside coz prawns are expensive and the hawker will usually give you measly ones).  Hah..hah...only in a homemade version can you find the
liew more than the noodles.

Make sure you get the stock boiling again before pouring it over your bowl of noodles...and my homemade 
kshf is ready for eating! ;)  Finish with a sprinkling of homemade fried shallots (yes, I do make my own fried shallots)...but no, this came out of a bottle (make sure they're good quality fried shallots ya).

Does the broth look legit or what?  The rim of the bowl even has that foam/bubbles you see in a real bowl of 
kshf cooked by a kshf sifu.

In fact, my broth is even more orangey in colour than what you'd get outside...and that's because it was made with the bones of choi yin kai and not the normal broiler chicken.  Those of you who have made soups with both types of chicken before will know the difference.  Since discovering the much richer, more umami taste, I don't make soups with regular chicken anymore.

Of course, if you're making your own 
kshf, you can opt for larger, fresher prawns to give you that (prawn) satisfaction you need which you don't normally get from an ordered bowl since they're usually smallish.

Taste wise, to be honest, it's not as good as those from the 
kshf masters and that's because I refrained from adding any sugar to my stock (this obviously gives sweetness to the stock, some hawkers use rock sugar)...and no msg, of course! >.<  I think it's decent enough for a homecooked version lah! ;P

Before I attempted this, I didn't know that it was so simple to make.  Now I look at hawkers selling 
kshf as having a much easier job compared to other noodle hawkers selling say curry laksa, prawn mee, wantan mee or fish head noodles, for example.  A hawker once told me (the couple was selling siu chow or stir-fry noodles) that they were closing and switching to selling pork noodles instead coz the work is much easier (apparently pork noodles is the easiest as you just need to prep the stock and cut up the raw pork).

In the end, if you want to show your skills at making
 kshf at home (to guests), then it's worth the while (if you're making plenty), otherwise just go out, order a bowl and safe yourself from all the hassle (of making just one portion).  I did it just to see if I can...and realised it wasn't that difficult.  One thing I did learn from this cookout is that I now know not to throw away the discarded prawn heads as I can make a good stock out of it...and use that stock to make soups. ^o^

Tuesday, 18 April 2023

What do I do with ramen noodles?

Last Chinese New Year, we were privileged to receive a festive gift hamper.....and among the items I found inside the hamper was a packet of dried ramen noodles.

Now what am I going to do with these ramen noodles?  It's not that I know how to make a tonkotsu (or pork bone) ramen broth.....nor would I even if I did.  I'm not willing to sacrifice my time over hours and hours of boiling the pork bones (anything from 10 - 16 hours! >.<) to get that sought-after rich, creamy, opaque, white broth that's the epitome of a good ramen broth.

I've eaten my fair share of ramen noodles though not particularly a big fan of it.  Ramen is best eaten at specialty ramen shops.  It's not something I would ever make at home.  For those who do, it's really a labour of love as it needs so much time and effort.  Since ramen noodles is a bit like our local Hakka noodles in looks, texture and taste, I thought I'd use up the noodles and cook something simple with it...hopefully with some Japanese-Chinese influences.

This packet of dried ramen noodles isn't any ordinary ramen noodles I gather.....as it says sun-dried sea birdnest handmade ramen on the box.  The pack came with 4 portions of noodles when opened.

No instructions were found in the packaging to advise how long I need to cook these noodles, so I'll just have to wing it! ;)  I cooked two portions of noodle (since one looked like it was so little, after all the whole pack was only 150g).  Testing along the way, the noodles were al dente after 4 minutes.

Once done, just lift them up into a bowl.  The noodles were pretty easy to lift up with a chopstick actually. They don't fall off as the noodles are in nice, long (not broken up) strands.  Before cooking the noodles, I had to prep some ingredients for my noodles.  It was a spur of the moment thing, so I just used what I had available.

I had some leftover fresh shiitake mushrooms (that I cooked the other day), a piece of fried beancurd (from my earlier chee cheong fun breakfast) and spring onions in the fridge.  Since this was going to be a meatless bowl of ramen (no chasu...nor know where to begin to make one), I thought shiitake mushrooms would make a good substitute for its earthy, meaty texture.

A proper bowl of ramen always come with a ramen egg (ajitama), a marinated soft-boiled (or should I say medium-boiled) egg with a custardy yolk that's barely set.  But why would I even bother to make a soy marinated egg for just one bowl of noodles.  So, I replaced it with a fried omelette instead (but sliced it into thin shreds for better presentation...lol).

It so happened that I had a chicken and prawn broth I made earlier (and froze), so I used that for my soup base.  I reheated the broth and boiled the leftover shiitake mushrooms in it to soften them.  Then, it was just a matter of assembling all the ingredients (nicely)...before pouring in the hot broth! ;)

Hey, the final product does look like it had a bit Japanese influence (no?) due to the shiitake mushrooms (fresh ones, not the dried Chinese kind) and spring onions which I chopped ever so finely to mimic those you'd find in abundance in a bowl of ramen (too bad I didn't have any dried Japanese seaweed).

To finish the balance two portions of the ramen noodles, I thought I'd cook it Chinese-style taking inspiration from a bowl of Hakka-style noodles.  For this, I just sauteed some minced pork that has been rubbed in a little cornflour and seasoned with salt, chicken powder, white pepper and a very light drizzle of soy sauce (just a little so that the noodles will stay white-coloured).

Once cooked, toss them with the al dente ramen noodles.  As traditional Hakka noodle does not have robust dark sauces for flavour, the minced pork would need more seasoning so that the noodles do not end up tasting bland.

Of course, the traditional Hakka noodle also gets its flavour from being tossed with pork lard oil and topped with cubes of crispy pork lard but since I don't normally have that at home, I can only toss them in fried minced garlic and garlic oil together with lots of chopped spring onions.   Finally, finish it off with more crispy garlic bits...and more chopped spring onions! ;P

Since I still had some frozen chicken stock in the fridge, I had the noodles with a side serving of soup filled with store-bought, restaurant-quality fried fishballs.

This actually turned out better than I expected.  It was a pleasantly delicious meal if I have to say so myself. It may not be as good as those authentic Hakka taipu noodle shops because of the lack of pork lard but certainly a good enough homecooked version if you enjoy subtle-tasting noodles.

As for the ramen noodles being sun-dried sea birdnest handmade ramen...well, it didn't taste any different from any plain ramen.  I just have to imagine I'm eating birdnest ramen...lol.

I didn't know what I would do when I saw the ramen noodles in the hamper and thought it might go to waste. In the end, it turned out to be the most tasty thing from the hamper.  I like the texture of these ramen noodles.

After this positive experience and knowing what I can do with them now to produce a quick, simple and nourishing meal, it has encouraged me to look for (an appropriate brand of) dried ramen noodles the next time I'm in a supermarket. ^_~

Thursday, 21 October 2021

#ewew cooks the Easiest Meat Sauce Ever!

I believe many of us have made a tomato-based meat sauce at one time or another....usually with help from our favourite brand of bottled tomato/pasta sauce.  Of course, there are those who don't believe in bottled sauces and would painstakingly make it from scratch with fresh tomatoes (refer to a Malaysianised recipe here if you're interested)...and that's fine too....whatever rocks your boat!   Well, I suppose there's nothing better than one that's freshly made, right?

But for the rest of us who are too lazy busy or don't have the luxury of time to cook it from scratch, we go for the cheat version.  We rely on bottled tomato paste and sauces...or, at least, I have.  So, who's up for the easiest meat sauce ever (which I discovered only recently)?  Not to mention it's also darn delicious! ;)

For that, you'll need a little help from Jamie Oliver!  I was browsing through Atlas Gourmet Market @ Shoppes at Four Seasons Place when I spotted it (this was way before the pandemic).  But that was so long ago (sometime in late 2018, yikes!) that Atlas Gourmet Market has now been converted into more of a bistro, pizzeria and deli than a high end grocery store (though you can still find some "atas punya" produce on sale like meats, seafood, cheese and wine).

I've always derived enjoyment browsing and walking through the aisles of high(er) end grocery stores coz they pay careful attention to shelf/produce arrangement where everything is so nicely presented...like these fresh vegetables that's so eye-catchingly colourful.  Even their organic vegetables, herbs and microgreens have their own (cold) indoor garden! ;)

I meant to cook this sooner but it was conveniently forgotten in the back of my pantry cupboard.....until recently! :O  When I took it out, I realised it was past its expiry date.  Adoi, sayang-lah if I have to throw Jamie Oliver's product away! >_<  Then I remembered a blogger-friend who was always dicing with danger by cooking and consuming expired goods.  She says some foodstuff are still good to go even after expiry.  Taking that into consideration, I googled and read somewhere that tomato-based pasta sauces can stay fresh 3 - 5 months past its expiry (because of the acidity) if the bottle is unopened (some even say it's good for 1 - 2 years but I won't go so far-lah).

So, I'm going to run with that and be brave....and use it so as not to let it go to waste.  After all, it smelled and appeared alright with no visible mold, change of colour or bulging on the cap + since it was an imported product, I was a bit more confident of its manufacturing process and packaging.

This will be the fastest pasta meat sauce you'll ever make, so don't blink or you might just miss it....hah...hah!  Start by sweating chopped onions and sauteeing minced meat of your choice (I used pork but you can use beef or chicken too) in some olive oil.  Here I'm keeping it really simple but you can always add on chopped garlic, tomatoes, celery and even bell peppers if you like.

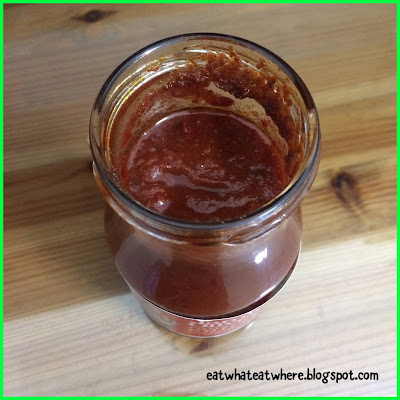
When I got Jamie Oliver's Tomato & Chilli Pasta Sauce (I can't recall the price now but I remembered it wasn't very expensive), I also bought his (or endorsed by him) olive oil to try (this was much more expensive than the pasta sauce, I remembered).

I did like the taste of this one and since it's much pricier than the usual brands I buy, I try to reserve it for use as dressing for my salads (with the occasional use for cooking only). ^_*

Jamie Oliver's
line of vinaigrettes also include balsamic, red and white wine vinegars.  I once had a bottle each of such vinegars but ended up discarding them (when they expired) coz I don't really use vinegars all that much in my cooking.

Coming back to Jamie's Tomato & Chilli Pasta Sauce, here comes the super easy part....just empty the entire (400g) jar of sauce into your sauteed pork mince and onions (or with additional vegetables mentioned earlier).  This is a lot less work (which suits me fine) compared to the time and patience needed to simmer a pasta sauce for 1 1/2 hours if made from scratch! O_o

As with all pasta sauces, one usually adds fresh parsley (though most of us will probably use dried parsley coz that's readily available in our pantry) but I like to add a Chinese dimension to it by adding Chinese parsley (or coriander) instead as I find it more fragrant.  Put in both stalks and leaves...but I only had stalks leftover in my fridge (actually, this is a good way of using up the stalks that we're often left with after using mostly the leaves as garnish, over steamed fish and in soups).

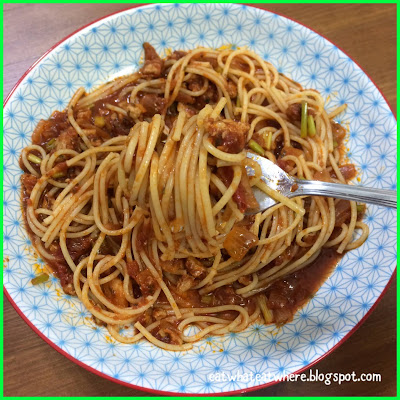
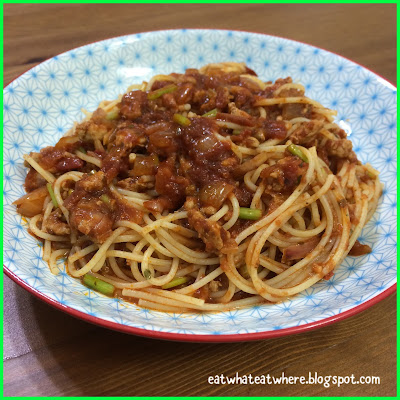
Cook it for a few minutes more and the sauce is ready (you can add some water if the consistency is too thick for your liking).  You may wish to add some additional seasoning also (like salt & lots of black pepper) to tweak the taste just right for you.  One jar of Jamie's sauce is good for 3 servings of pasta (for me).

If that's not the easiest meat sauce you'll ever make, I don't know what can be easier or faster than that! ^.^  P/S: One day I hope to (have the will to) make it from scratch (perhaps when I'm inspired to cook it for a party and want to impress my guests that the pasta sauce is homemade...kekeke) but the allure of its simplicity coming out from a jar isn't something I'm ready to give up for now! :D

For my pasta of choice, I used spaghetti vermicelli which is slightly thinner than regular spaghetti but thicker than angel hair pasta (but in Italy, it seems it's the other way round).

I've always 'trusted' Jamie Oliver, after all, he was the very first person who taught me how to bake/roast chicken and potatoes in the oven successfully (a method which I've continued to use till today).  I'll tell you why this is the best tasting bottled pasta sauce I've come across thus far....it isn't as acidic as some of the ones I've had before. 

Not only that but, more importantly, this one has this subtle chilli warmth to it making this lovely tomato-based meat sauce that much nicer to eat (much like a chilli con carne).  It's not spicy at all but that little hint of chilli makes all the difference to the taste. ^o^

Since no-one is a fan of tomato-based pasta sauces in my household, I have two extra portions that I can freeze to be enjoyed later.  Heheh, I've consumed expired goods and lived to tell the tale! *_*

If I can get a good quality ready-made jar of pasta sauce that's equally tasty, who says I can't make my life simpler with a little help from my "friend".....lol!  Good bottled pasta sauces that can be whipped up in an instant is a saviour to anyone tasked with putting food on the table and a staple that's beneficial to have in your pantry.  Well, if I'm out grocery shopping and happen to spot Jamie's Tomato & Chilli Pasta Sauce again, I'd be sure to restock my pantry with it. ^_~

Monday, 27 May 2019

#ewew cooks Mamak Mee Goreng

Since discovering the beauty of using a freshly made chilli paste (and how easy it was to make it from scratch), I've begun to experiment (and use) it incessantly in my cooking.  Now, why didn't I discover this sooner? ;)

It adds so much freshness and taste to any dish.  It's especially good in fried rice and fried noodles.  I've since used it to great success in a home-cooked version of Mamak Mee Goreng which, before this, I thought I could only order at mamak restaurants.

You start by pounding or blending an easy-to-make fresh chilli paste...the same one I first made to cook my Shrimp Fried Rice.  The paste is made with 2 red chillies (or substitute with 8 bird's eye chillies for more heat), 4 cloves of garlic, 6 shallots and a knob of ginger (about an inch).  And the best thing is, you don't even need a recipe for the chilli paste, the amount of each ingredient can be varied and it won't really affect the taste too much.  If you like more garlic, put in more, if you like more shallots, use more and if you like more heat, add in more chillies...anything goes! ;)

Actually, I've never ever fried any kind of noodles at home before (until I started to made my own fresh chilli paste) as I thought it wouldn't be any good fried with just soy sauce.  Fry half of the chilli paste (about 3 heaped tbsp) in 2 tbsp of oil for about 1 - 2 minutes until aromatic (use more chilli paste if you like a more robust flavour).

Push the chilli paste to one side of the pan, drizzle in another 1/2 tbsp of oil and add the shrimps with a little bit more garlic.

Next, add the finely shredded carrot (first) and fry till the carrot has soften.  This has always been my bone for contention when eating mee goreng at mamak stalls (or any dish with carrots at Malay or Thai stalls) coz they're usually hard and I've always hated that...and that's because they like to add in all the vegetables at the same time.

Once the carrot shreds are well softened, add the other vegetables of choy sum (Chinese flowering cabbage) and taugeh (beansprouts).  Stir-fry these for only a few seconds as they'll continue to cook further during the noodles stir-frying process.

Push all that to one side, add another 1/2 tbsp of oil and crack an egg in.  Break up the yolk with your spatula.

Stir the eggs around the pan until the egg bits are cooked but not necessarily fully cooked.

At this point, add in the mee (I used half of a 450g packet of yellow mee) and season with 1 tbsp of sweet soy (kicap manis), 1/2 tbsp of dark soy (kicap pekat) and 1/2 tbsp of light soy (you can crank up the light soy if you like it on the saltier side).  Stir the noodles around until the sauce is well mixed in.  Taste to see if you've got the seasoning right.

#Interesting Tip:

Now, how the yellow mee should be treated (before being fried) is a cause of contention.  Since I've never fried yellow mee before, I had to do some research and get advice from the cooking guru-s.  Some say you have to rinse the mee first (method 1) while others (like phonghongbakes) say you don't have to (method 2). I even read from the papers that some would even boil the mee first (method 3) before frying as it would take away the bitterness of the mee (it seems).  Ai, I've always had the impression that the bitterness is due to the quality of the dark soy used.  So, which method did I use?  Read on to find out. ^_~

But you certainly have to fluff up (separate) the noodles.  With some brands, the mee may even be stuck together, so I would even painstakingly separate the stuck strands one by one with my fingers.  Trust me, it's worth the extra effort.  That way, when it's fried, it won't clump together.

Once the sauce is well incorporated and the noodles are almost done, add in some finely sliced red chillies (for more oomph and colour).  The dark soy tends to caramelise and stick to the bottom of your pan, so add a little water to lift up all those yummy bits from the bottom of the pan (similar to deglazing the pan in western-style cooking).

My Mamak Mee Goreng is done :)  Does it look anything like the real deal? ;P

Well, here's the real deal for comparison.  Same Same? :D  Hmmm, almost...maybe?  If you like it spicier, use more chilli paste or throw in a few fiery, whole (but smashed) green cili api at the end, like what the mamak restaurants do.

I actually love to eat mee, so it makes sense that I'd love mee goreng.  If it's curry laksa, it had to be mee & meehoon.  If it's prawn mee, it had to be mee & meehoon.  If it's char kway teow, it had to be mee & kway teow.  Even when I tapau fried mee & meehoon from those Malay or Chinese stalls, I always ask them for more mee and less meehoon...hehe! ;)

Sorry but I have to blow my own trumpet.  Who knew that my home-cooked Mamak Mee Goreng (with shrimps) would turn out so successful. ^o^

I cooked it again using the balance half of the yellow mee (with restaurant-bought fish cakes) and it was just as delicious the second time round.  Next time, I'm thinking I might even want to add some beancurd puffs (like how some mamak restaurants do it).  As a yardstick, a packet of 450g yellow mee should feed a family-of-three nicely (but also good enough for two portions of cooking with one portion able to feed two smaller tummies).

Now, coming back to whether you should rinse your yellow mee first or not, I'm glad to report that I tried both methods...and both options work.  No, I didn't get soggy noodles with rinsing them first (just make sure you drain well), neither did the noodles stick to the pan (use a non-stick one for ease of frying).  I think rinsing the noodles first got rid of or, at least, reduces the alkaline flavour in the mee, so this would be the option for me.  But I certainly won't boil the noodles first as I think they'll end up too soft and overcooked when fried.

When I'm at mamak restaurants, this is one of my favourite dishes to eat (besides roti telur) but I've seen some use the curries they cooked (which may not be at its freshest) to flavour the noodles while some versions are simply too oily.  Cooking your own version at home will (at least) be fresher and a little healthier as you'll be in control of the oil and ingredients.

I think the three key success points to a good mee goreng (or at least the one I cooked) is the use of sweet soy and a freshly blended chilli paste, the effort to fluff/separate the noodles and not frying too big a portion at one go (just like why char kway teow tastes the best when fried plate by plate).  Sweet soy has both the properties of a thick, dark soy together with some sweetness (and I'm beginning to discover the delight of using kicap manis in my cooking).  The caramelisation of the sweet soy lusciously coats each strand of mee for a tasty mouthful.

If someone like me, who has never ever fried noodles at home in her life, can make a success of this, so can you!  Try it once and you'll realise it isn't that difficult to do.  And maybe....just maybe, it'll be the start of many noodle-frying and wok-ing sessions in your home! ^.^

Serves 1 very hungry person or 2 people who are trying to eat less carbs

Related Posts Plugin for WordPress, Blogger...