Pages

Showing posts with label #ewew cooks: Vegetables. Show all posts

Friday, 14 February 2025

How many ways can you cook/eat bitter gourd?

Like all bitter vegetables, the humble bitter gourd or bitter melon is an acquired taste.  It's a case of you either love it or hate it!  I remember I hated them when I was young...all the way to my adult years.  If I see it at the chap fan line, I would avoid it like the plague...but I've since grown to love this vegetable! ;)

Although I would gladly pick them out from a chap fan line now or choose them stuffed in a yong tau foo, I've never cooked them at home.  The reason for this is because I was afraid they'd turn out bitter coz, first of all, I don't know how to choose the "right" bitter gourd (one that's hopefully less bitter) and, two, I wasn't sure if the "process" we had to go through to take out the bitterness would actually work.

One of the most common methods to reduce bitterness is to salt the bitter gourd generously (after they've been sliced with the seeds removed and the pith scrapped off).  Rub salt all over the bitter gourd slices and let it stand for about half an hour.  The salt will draw out water from the bitter gourd and apparently remove some of that bitterness.

So I consulted my favourite pork noodles stall in my neighbourhood and he told me you don't have to do that actually...you just need to choose a bitter gourd that has less 'teeth' or ridges (or wide/'fat' pronounced ridges).  The larger, lighter green variety with the widest ridges is the one you want as they're generally less bitter.

Armed with that knowledge, I followed his advice to a tee and purchased my very first bitter gourd which turned out just fine, not bitter at all.  So, that extra step of salting it first is a lot of baloney which you don't need to do if you chose the right bitter gourd in the first place.  Now that I know, I cook it quite often at home since bitter gourd is known to help lower blood sugar levels besides having other immense health benefits.  I now include bitter gourd into my diet regularly and cook them in the following ways.

#1 - Stir-Fried Bitter Gourd with Eggs

One of the most common and popular way to cook bitter gourd is to stir-fry them with eggs.  For this dish, I used half a bitter gourd and 2 eggs.  This is good enough as the vegetable component for 2 meals for me.  (So PH, can rival Kar Hiong's...lol)! ^_~

The key is to make sure you fry the bitter gourd slices until they're well soften (I hate hard bitter gourd!), so slicing them thinly helps.  Fry slowly on medium heat, you don't want them to brown, just soften, so you'll need a good 5 minutes for that.  I add in the minced garlic about halfway through so that the garlic don't get too browned by the time the bitter gourd softens.  Once well soften, push them aside and add in your beaten eggs.  Scramble them and mix in with the bitter gourd.  Season to taste.  You may add a little water at the end.

#2 - Stir-Fried Bitter Melon with Canned Black Bean Fish

This is a great recipe if you happen to have leftover canned dace fish with salted black beans (which I do as one can takes forever to finish).

You cook it similarly as the earlier dish.  Fry the bitter gourd slices until well soften before adding the canned dace fish (break into smaller pieces) and salted black beans.  I added the sauce from the canned dace fish too for its saltiness...sorry, that's why the bitter gourd looks darkly-coloured.  If you use just the salted black beans, it'll probably look more presentable and appetising.

#3 - Stir-Fried Bitter Gourd with Anything

You can pretty much stir-fry bitter gourd with anything.  I usually do it with homemade fish cake or pork slices though I like it with egg the best.  You can also do it simply with just salted black beans or taucheo (salted fermented soybeans).

#4 - Bitter Gourd Omelette

Another dish you'd find in a chap fan line, though not as common as the earlier stir-fried bitter gourd with eggs, is this bitter gourd omelette.  It's not as popular with kids (and some adults) who love eggs but not in an omelette with bitter gourd...lol.

I used 1/4 of a bitter gourd with 2 eggs for this omelette dish.  Again, I ate this over 2 meals...since I'm the only one who appreciates bitter gourd in my family! >.<

#5 - Bitter Melon Soup with Pork Ribs

Since I'm making soup in a slow cooker with pork ribs, I can afford to cut the bitter gourd into larger chunks for both to simmer slowly till tender (the bitter gourd needs only about an hour to get soft, so slow-cook your pork ribs first).  I think the pith (the white part) contributes to the bitterness, so removing most of it (and the seeds) is critical, especially so if we're boiling the bitter gourd for a period of time to minimise the bitterness that would otherwise get into the soup.

I added some white peppercorns to introduce a bit of heat into the soup which also helps to reduce bitterness, if any.  My bitter melon soup (that only I would drink) is made with half a bitter melon and one strip of pork ribs.  Hot soup with a bit of rice is especially good on a cold, rainy evening.

#6 - Bitter Gourd Soup with Pork Slices

If I want to make a soup that doesn't need hours of boiling and simmering, I would make a quick soup by cooking it over the stove (or, in my case, over the induction cooker).  For this, I slice the bitter gourd thinly so that it softens quickly.

Once that softens (it only takes about 5 minutes), you can add in the pork slices (also thinly sliced and marinated in cornflour and some soy) as they cook very quickly (another 2 minutes).  It's just like the way they make pork noodles.

#7 - Bitter Gourd Pork Noodles

This is my favourite pork noodles with bitter gourd from my neighbourhood stall.  The bitter gourd slices are sliced ever so thinly so that it gets cooked and softened easily.  So good with my choice of yee mee.  It's pretty similar to the bitter gourd soup I make at home, only this one comes with the innards I love.

The bitter gourd he gets for his noodles have even fatter ridges than the ones I buy.  He cuts it so thinly that it's almost transparent.  Let me show you up close just how far apart the ridges are! ;)

This is one vegetable that doesn't get much love during CNY obviously because of its name....fu gua due to its pronunciation.  He hardly get any orders for it (with pork noodles) during this period, especially not from the elderly who avoids it like the plague, he says.  He may get some orders from young people who are oblivious to its connotation! ;D

#8 - Deep-Fried Snake Gourd

Side tracking a bit, I've included this snake gourd in my post coz I used to mistake it for bitter gourd initially. They're only similar to bitter gourd in looks but don't taste bitter.  This snake gourd is seldom found in chap fan lines (they prefer to cook bitter gourd instead) but commonly found in Indian restaurants where I used to eat them...either as a stir-fried vegetable or deep-fried with spices to a crisp (mmm, my favourite).  I suppose you can deep-fry bitter gourd in the same way too.

For those who like a bit of bitterness in their lives (lol), cook the bitter gourd in a soup as the bitterness tends to leak out into the soup and you'll be able to taste the bitterness a bit more.  Cook them in a stir-fry with other proteins if you wish to mask the bitterness or possibly taste none at all.

Now that you know just how simple it is to choose the right bitter gourd (that's not bitter or hardly bitter), all of us should try to eat more bitter gourd for its immense health benefits.  So, with fears of getting a bitter tasting bitter gourd allayed, I've been cooking this humble vegetable more often at home now! ^_~

Thursday, 21 November 2024

#ewew cooks Fish Paste Related Dishes

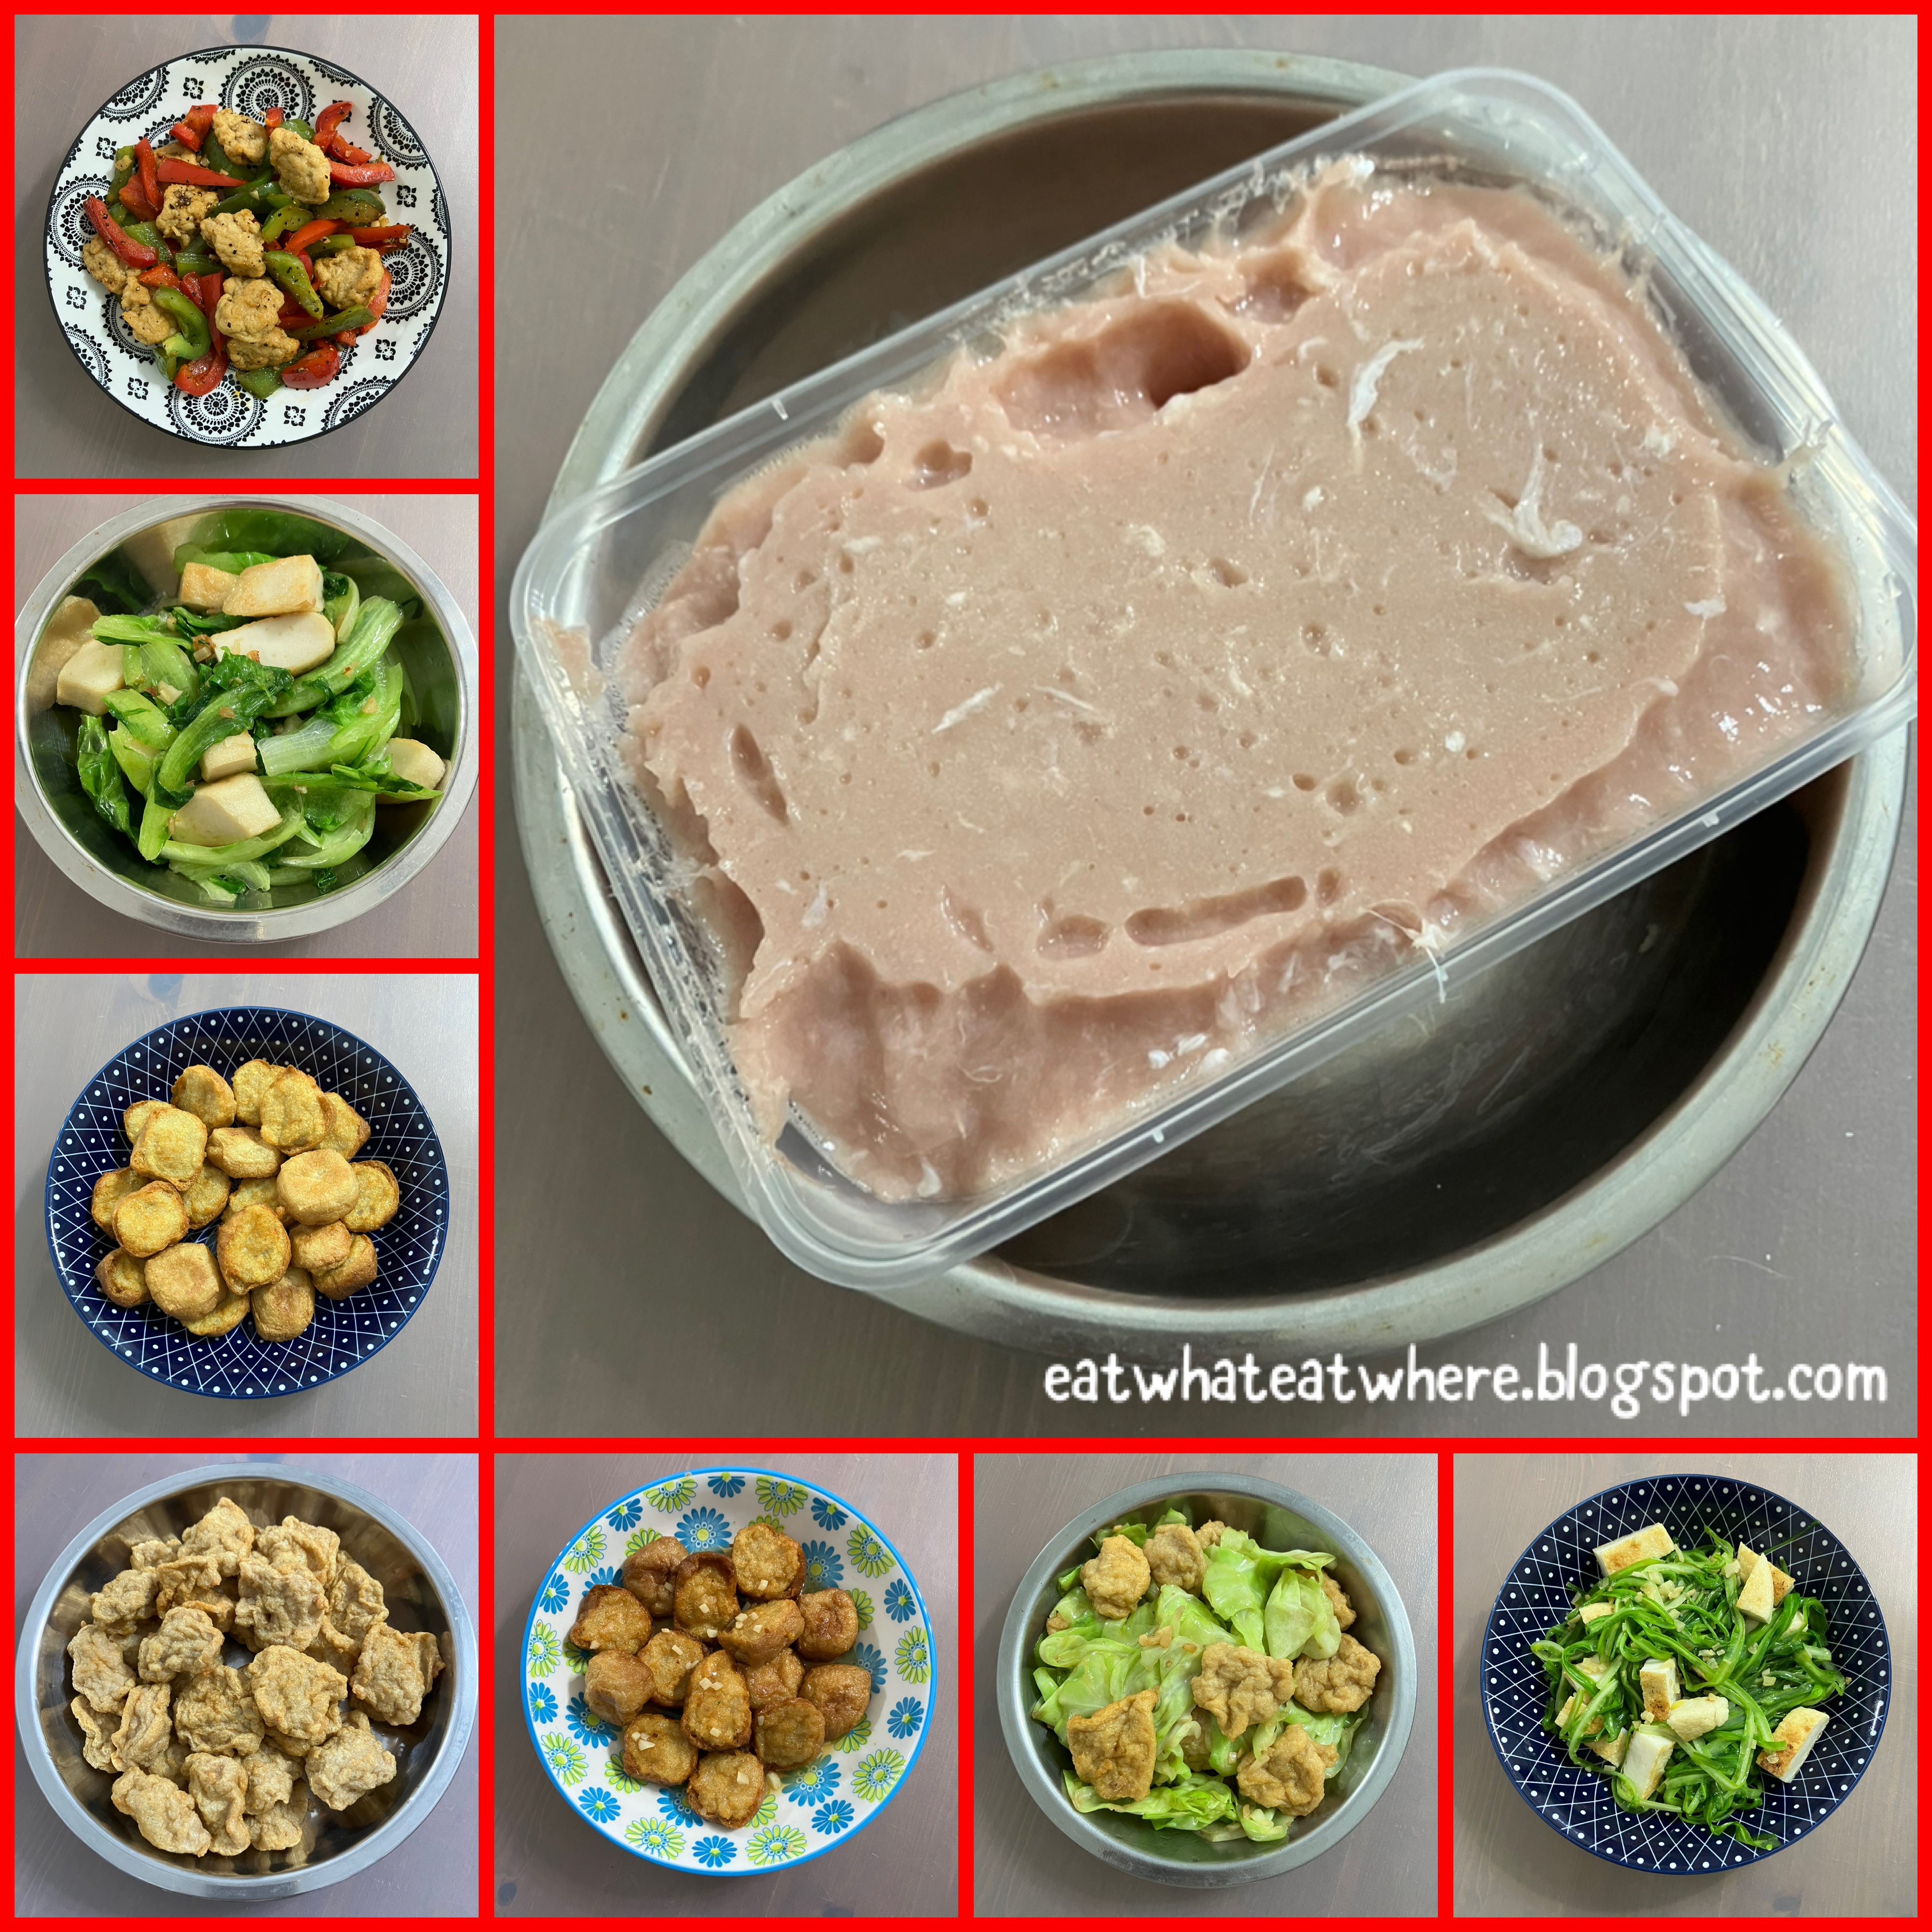
For those who have read my previous post on how much I love to eat fish cake, I now also love to cook them at home.  This was after I found a good ready-made fish paste recently from my fishmonger at the wet market.

It comes conveniently packed in a tub like this and one tub costs RM20.  A small price to pay for something that's very time consuming to make from scratch.  I first learned how to make fish paste from watching my mom do it but made it only once after that...and realised it was too much work...lol! >_<

There are a few types of fish that's suitable to make fish paste (into fish cake or fish balls) such as wolf herring (ikan parang or sai dou yue), narrow-barred Spanish mackerel (tenggiri batang or kau yue) distinguished by its narrow body size with vertical bands, Spanish spotted mackerel (tenggiri papan, some call this tenggiri bunga also ) recognisable by its broader body with spots and yellowtail fusilier (which is the best fish to use according to the experts) while some even use tilapia (the first two are the more common options).  I get a whole kau yue/Spanish spotted mackerel/tenggiri papan and if you can't differentiate (like many of us) which type of mackerel to use (and if you think you can spot the difference between spots & vertical bands, good luck...lol), it's best to just ask the fishmonger for the one that's meant to make fish paste (coz the right one has a stickier flesh when done).  You then get your fishmonger to cut it lengthwise into two fillets for you (leaving the bone in the centre).  When at home, scrape the flesh off the skin (and bones), then use a big cleaver to chop/mince the fish meat finely until it forms a sticky paste.  While doing this, make some salt water (by mixing salt with water, my mom adds a bit cornflour) and season the fish as you chop.  The chopping/mincing part is tedious (I've seen my mom using two cleavers to do this).  Don't waste the unused parts like head, bones, skin and tail as you can make a good fish stock out of them by frying them first before boiling with some aromatics.

For convenience, I just rely on ready-made fish paste coz I'm not willing to go through all the work of making my own.  Of course one of the most common thing you can do with fish paste is to stuff them and make yong tau foo.  That to me also involves too much work...you have to slice up all kinds of vegetables (like eggplant, bitter gourd, ladies finger & chillies) and some are tedious to stuff before deep-frying them, so I'm more into buying ready-made yong tau foo too.  The only yong tau foo I'd consider making (coz it's the easiest) is to stuff them into a tofu puff.  You just need to cut each tofu puff into half and fill it with a bit of fish paste before shallow-frying them.

You can serve them just like this...which I do (since my son loves them this way).  The tofu puff turns out really crispy if you eat them soon after they're fried.

I'd sometimes cook them in a simple sauce of oyster + soy especially if there are leftovers (not that it happens often!).  This is because since they're leftovers and had gotten soft, so it's more ideal to let the softened puffs absorb the flavours of a sauce.

Other than making the simplest form of yong tau foo, I usually just make them into mini fish cakes.  I just shape them into small round pieces by scooping some fish paste into the palm of my hands to shape them (just make sure you wet the spoon and your hands so that the fish paste doesn't stick to your hands).  See how they puff up during the frying process.  But first, as promised in my previous post, I would share with you a little secret/tip on how and why I was served a fish cake that looked deflated.

That's because I've come to know that the fish paste I buy from the market is made with pure fish meat with probably no flour in the mix (or if there is, just very little)...and when it's fried, it puffs up looking like a proper fish cake but once cooled, it deflates and looks all wrinkly.  Those you come across which keeps its shape well (even after frying) probably have a lot of flour to keep the texture firm and the fish cake in shape...and that explains its overly springy/bouncy texture.  I actually love to eat this type of fish cake that's made purely with just fish even though they aren't that pretty to look at.  I usually fry up the whole tub and keep them for use in a stir-fry later with my vegetables of choice.

Just a simple stir-fry with cabbage, I've both protein and vegetables in one dish...which is perfect for me for a one-dish meal which I cook frequently.

You can cook them with any vegetable of your choice...just like I did here with red and green capsicum. Really delicious.

If I weren't able to get the ready-made fish paste from my fishmonger, I'd settle for the ready-made fish cake from Ah Koong whenever I happen to dine there.  Just remove from the package and pan-fry lightly when you're ready to eat them...so simple and convenient! ;)

Again, I use it in the same way...stir-fried with some greens.  I especially like it with green dragon vegetable (ching loong choy).

I also stir-fry it regularly with romaine or cos lettuce (yau mak) or spinach (poh choy).  I like to cut the fish paste into thick slices for a good bite (you can cut them thinly too if that's what you prefer).

So, there you have it...the next time you have fish cake, if it's deflated and ugly looking, you know it's made with (almost) pure fish paste and that's all good (at least to me)...lol! ^_~  But between the two, ready-made fish paste or ready-cooked fish cake, I'd go for the former (even though there's a bit of extra work involved in frying them) since it tastes loads better.  And best of all, you don't have to worry about the seasoning, it comes already seasoned with just the right amount of salty aftertaste.  So yum, so good! ^.^

Wednesday, 1 September 2021

#ewew cooks Stir-Fried Chinese Leeks with Lap Cheong

The first time I cooked leeks was during Chinese New Year (CNY) earlier this year.  It so happened I was at my neighbourhood supermarket when I noticed the leeks (and if I remember correctly, I think they were from China).

Even though I've never cooked leeks before (I'm the only in my family who likes them, so I usually get them from the chap fan stalls when it's available), I decided to get some since leeks is an auspicious ingredient for CNY.  Cooking this for our reunion dinner with (extended) family, I didn't know I would like it so much.  

So, the other day, when I spotted leeks selling at my neighbourhood wet market, I immediately got myself some as I wanted to cook and eat my Stir-Fried Chinese Leeks with Lap Cheong again.  Even though the leeks I got this time were also from China, they weren't as thick as the ones I bought previously.  The previous ones were much larger and tend to have a longer length of the white parts but they were also more expensive.

The leeks look like a plumped up version of spring onions.  This dish is one of the simplest dishes you can cook.  All you need is just two ingredients.....leeks and lap cheong (Chinese sausage) and a bit of garlic, of course.  It can't get any easier than that! ;)

Cut your leeks diagonally (it's much prettier and more presentable that way)...just the white parts (which also means the lighter green parts).  Now the debate is on whether the (darker) green parts of the leek are edible (more like good enough to eat).  Most said yes, it can be eaten (I'll let you know what I think of that later).

I start by pan-frying the lap cheong slices in some oil first (before adding the chopped garlic)...and that's because I like them slightly caramelised (but that's just me).  The sugar (or sweetness) in the lap cheong helps with the caramelisation and makes it that much more fragrant.

But if you don't like those darkened bits (as I know many people freak out at the sight of them), then put both the lap cheong and garlic in to stir-fry at the same time.

As soon as the garlic browns, add in the sliced leeks....the white parts only! ;)  The leeks should be cooked until the texture still has a light crunch.  That's how I like to eat them.

I don't like to cook it till too soft...so I don't add any water (nor cover my pan) to help it soften.  The frying process itself would soften it naturally.  It should only take a minute or two and I simply seasoned it with a bit of salt.  That's it.....is that too easy or what?  Lol.

I've been hooked on eating this simple dish of Stir-Fried Chinese Leeks with Lap Cheong ever since I first cooked it for CNY.  And the beauty of this stir-fry is that nothing is set in stone!  You don't have to have an exact amount of each ingredient in a stir-fry, you can vary them according to what you like to have more.  In this case, you can use more lap cheong if you want more meat in your dish (here I used one lap cheong to 3 stalks of leeks).

The sweetish-salty flavours of the lap cheong goes really well with the oniony flavour and crunchy texture of the leeks.  Just ensure you get some good quality lap cheong and this one was fragrant with that hint of wine...really good.  Now all you need is rice!  This is typical of those easy to make one-dish meals that I like (and this was the perfect portion for me with a small bowl of rice). ^o^

How do you know if you'll like leeks?  Well, if you're someone who enjoys eating spring onions, garlic chives or even onions, then you'll most probably enjoy leeks too as they all share an almost similar taste profile.  I love them...but I've to say the China leeks I got during CNY were just a tad sweeter and tastier though.  I'm not sure if it was because it's a different variety or because it was the timing when it was grown (nearer to CNY)! ;)

Coming back to the question of whether the green parts can be eaten....well, the answer is yes...but it wouldn't be very tasty (when I included them once)...at least not to me.  The darker green parts I found to be quite stringy and chewy.

The other negative would be that there's quite a bit of dirt and sand trapped in between the green parts, so you have to be extra careful to remove the layers of the leek to wash them thoroughly.  I wouldn't go through all that trouble seeing that it wasn't that nice to eat in the end.

The most common pairing I've eaten leeks with is with siu yuk (I usually find it at chap fan stalls where it's cooked till soft).  You can cook it with waxed meat too.  Or cook it with canned spicy pork cubes it seems (perhaps I can try that next). 

I think I'll stick to eating the best parts only....which are the more delicate white parts! ^.^  For those of you who love leeks and are looking for a simple stir-fry or one-dish meal, this is a good contender.  If you end up liking it as much as I do, you can perhaps cook this for CNY since the dish bears auspicious ingredients of leeks and lap cheong which signifies wealth and long life!  You bet I'll be getting more of the plumper leeks if I see it sold during CNY again. ^_~

Tuesday, 6 April 2021

#ewew cooks Chukadon (Chinese-Style Rice Bowl)

I've always known this dish simply as chow chap choy (Chinese stir-fry mixed vegetables) until I chanced upon a recipe by Just One Cookbook (JOC) who referred to it as Chukadon.  The name is so Japanese, so much fancier than chap choy...so Chukadon it is...with a slight Japanese twist, of course! ;)

I think every Chinese family would have cooked stir-fry mixed vegetables at some point for their home meals as it's super convenient and a complete one-dish meal that you can put just about everything in it.....meat, seafood and vegetables.

Ingredients:

15 (medium-sized) prawns
15 slices of lean pork
1/2 a small carrot, cut into thin slices
2 - 3 bunches of siew pak choy (or bok choy)
4 - 5 leaves of cabbage
3 - 4 mook yee (or wood ear fungus)
3 - 4 shiitake mushrooms, stems removed & sliced
2 cloves garlic, chopped

Marinade for the prawns & pork:
1/2 tbsp cornflour
1 tbsp mirin
1 tsp light soy

Seasoning for the sauce:
1 tbsp mirin
1/2 tbsp oyster sauce
1/2 tsp chicken stock granules
Cornflour slurry

Preparation:

I got these lovely frozen medium-sized sea prawns (size 41/50 for RM38) from my regular seafood supplier, Vfresh, again.  I initially thought there were only two layers of prawns but was delighted to find there were actually three layers when I defrosted them (for a total of 33 prawns).

Prep the prawns...de-shell, devein and slit at the back.  Rub the prawns and pork with the marinade.  I substituted sake with mirin (my Japanese twist) since I didn't have any sake.  Mirin is similar to sake but only sweeter with a lower alcohol content.  You can substitute with Shaoxing wine too if you like.  Leave to stand while you prep the rest of your ingredients.

Cut vegetables into bite-sized pieces (I wanted to include bamboo shoots but couldn't find any).  Though this dish is usually done with napa (or Chinese) cabbage, I prefer regular cabbage (better still, Beijing cabbage). Pre-soak wood ear mushrooms till soften, remove stems and cut into smaller pieces.  Do the same with the shiitake mushrooms (but no need to pre-soak as these are not the dried kind).  Make a cornflour slurry (with 1/2 tbsp cornflour + 1 tbsp water) for thickening the sauce.

Method:

Heat some oil (about 2 tbsp) in a wok (or non-stick pan) and fry the prawns and pork first.  If you want them to sear well, do not move them around with your spatula.  Give it time before you turn them over and the soy (in the marinade) helps give the meat/prawns that light charring.  When almost done (it's ok if the prawns and pork aren't cooked all the way through yet as they'll be cooked again with the vegetables), dish them up onto a plate.  This is so that they don't get overcooked when you stir-fry them again with vegetables.

Add more oil (another 2 tbsp) and saute some chopped garlic (sorry, I can't not put this must-have ingredient in a Chinese stir-fry even though this is more a Japanese take on the dish).  Put in the hardest vegetables to cook first (the carrots) followed by the cabbage and stems of the bok choy.

When the harder vegetables start to soften, add in the rest of the ingredients...the wood ear fungus, shiitake mushrooms and leaves of the bok choyFor the wood ear fungus, I'd choose the thinner type (as opposed to the thicker ones we usually use for Hakka Char Yoke) as it goes better with stir-fry vegetables (this was suggested by my dry goods seller...and I have to say I agree it was a good recommendation).  Add a little water (about 2 tbsp) to start the sauce going and to help soften the vegetables and mushrooms (the vegetables will release some water too).

Return the cooked pork and shrimps and pour in the seasoning (together with another 2 tbsp water) to make the sauce.  I decided to use less oyster sauce and light soy (and substituted with chicken stock granules) for seasoning as I wanted the dish to stay light coloured.  Drizzle over some cornflour slurry to thicken the sauce.  Keep stirring and it'll 'tell' you how much you need (if it's too thick, add more water).

Serve it over a bowl of steaming hot rice and you have yourself a comforting bowl of Chukadon, an all-in-one rice bowl that has meat, seafood and vegetables for a completely balanced meal.

I was inspired by JOC to cook this dish 
but was a bit confused to see the recipe calling for the use of one and a half cups of stock (or water) which I thought was way too much for a stir-fry.  That's almost like braising and I wonder how all that liquid got reduced in the recipe (and if it did, the vegetables would have been too soft and mushy by then).  I ended up using no more than a quarter cup (about 4 tbsp)...and I still had a sauce.  Not only that but I felt the seasoning was also excessive and I needed (and used) less even when my quantity of ingredients was more (and the dish turned out savoury enough).  So, it isn't advisable to follow a recipe blindly but be ready to chop and change...and use your instincts during the cooking process to tweak it to what works best for you.

After all is said and done, I did love the dish (with some minor adjustments, of course)! ^o^  The Japanese twist to this dish was the use of mirin and, believe you me, the taste of the mirin in the stir-fried vegetables was quite evident.  It certainly perked up the dish with some fragrance and sweetness that's different from a quintessential Chinese stir-fry.

You can even eat this as one of the dishes with rice in a typical Chinese meal at home.  This reminds me of a popular dish we can get at a siew chow stall outside where the sauce is thickened with egg (much like kong fu chow or Cantonese stir-fry noodles).  It's what we call mun fan when served with rice (or simply stewed vegetables with rice).  You could do that too and stir in an egg into the vegetables which will give you plenty of sauce.

What's not to like in a dish like this...when the prawns are fresh and firm, the lean pork absolutely tender (due to the cornflour mix), vegetables with a crunch, soft mushrooms and a delicious sauce that binds everything together.

The ingredients for this stir-fry are easily inter-changeable with what vegetables you have in the fridge.  You can swap regular cabbage with napa cabbage (or pak choy), fresh shiitake mushrooms with dried ones or bok choy with sugar snap peas.  You could also add things like bamboo shoots (I would have loved to include this but it's not an easy ingredient to find), fried tofu, cauliflower, broccoli, capsicum or even squid.  Just bear in mind the colours of the ingredients so that you end up with a colourful stir-fry that's aesthetically pleasing to the eye and yet tasty.

It's such a healthy dish that we should all aspire to cook....and eat more often.  It keeps well and it's great as food prep too (just undercook the vegetables a little as it'll become softer when you reheat the dish later). And I was kindly reminded by a blogger friend that this is also an ideal dish for slimming.  Well, it certainly can be if you choose to eat it on its own (without rice).

I've made this a totally Chinese-style dish also by omitting the mirin and using Shaoxing wine instead.  I would stir-fry the vegetables with some slices of ginger (and garlic too, maybe even a dash of sesame oil) to give it that distinctive Chinese stir-fry taste.  Whether Japanese-inspired or Chinese-style, it works just as well and taste just as good both ways.  Try it.....both styles! ^_~

Serves 2 - 3 (as a donburi or one-dish meal) or 4 - 5 (as one of the dishes in a Chinese meal with rice)

Related Posts Plugin for WordPress, Blogger...